Fine-tuning Llama 3 in 14 minutes using ReFT

If you have been fine-tuning models recently, you have most likely used LoRA. While LoRA has been the dominant PEFT technique for a long time thanks to its efficiency and effectiveness, a new paper from Stanford proposes a technique called ReFT. ReFT is more parameter efficient than LoRA, trains faster, and is able to match its performance.
After talking with ReFT paper author Zhengxuan Wu, we fine-tuned Llama 3 8B using ReFT on a single NVIDIA A10 GPU, which took only 13 minutes and 44 seconds!
What is ReFT?
ReFT, which stands for representation fine-tuning, is a type of PEFT which allows models to be fine-tuned much faster and on lower end hardware. The method was introduced in the paper ReFT: Representation Finetuning for Language Models.
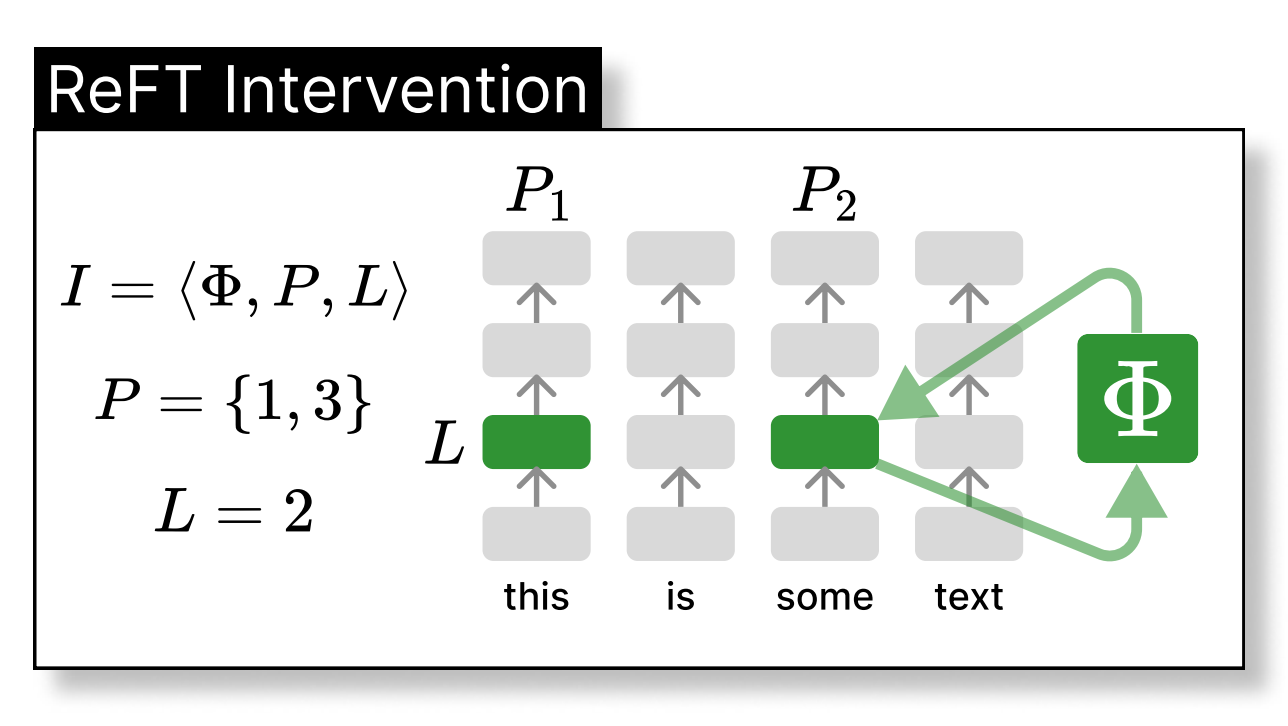
ReFT works by applying an intervention to the residual stream of a model. It doesn't modify any of the original weights, and instead manipulates the representations at specified locations.
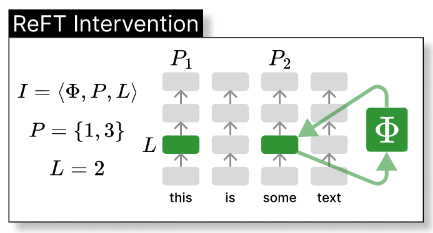
LoReFT is a type of ReFT which applies an intervention in fewer dimensions which is then linearly projected up to the full representation, allowing it to be even more parameter efficient.
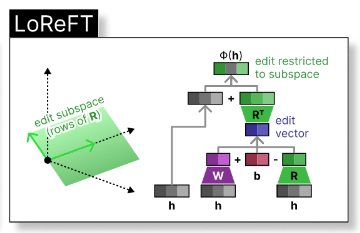
LoReFT is more parameter efficient than LoRA and matches its performance, so it is a great alternative for even faster training or with tighter memory constraints. The only drawback is that it adds a small amount of extra parameters to the model, but this is usually negligible.
Fine-tuning the Model
The code shown here is not the full code! If you want to follow along in code or run this experiment yourself, you can get a copy of the Jupyter notebook and the trained model here.
Loading the Model
To load the model, you will have to import the necessary libraries which can be found in the notebook. If you want to use Llama 3, you will also need to be granted access to the HF repo, because the model is gated.
model_name = 'meta-llama/Meta-Llama-3-8B-Instruct'

model = AutoModelForCausalLM.from_pretrained(model_name, torch_dtype=torch.bfloat16, device_map='cpu', attn_implementation="flash_attention_2")

tokenizer = AutoTokenizer.from_pretrained(model_name)
We need to specify which layers to apply the LoReFT adapter to, so let's print out the model architecture.
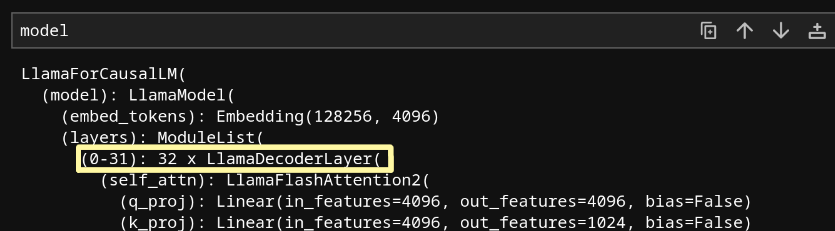
Since our model has 32 layers, let's apply a LoReFT intervention to the 16th layer, halfway through the model.
reft_config = ReftConfig(
    representations={
        "layer": 16,
        "component": "block_output",
        "low_rank_dimension": 4,
        "intervention": LoreftIntervention(
            embed_dim=model.config.hidden_size, low_rank_dimension=4
        )
    }
)

reft_model = pyreft.get_reft_model(model, reft_config, set_device=False)

device = 'cuda' if torch.cuda.is_available() else 'cpu'
reft_model.set_device(device)
Great! The model is set up and ready to train.
Getting the Data
Let's fine tune the model to determine whether a piece of text uses dishonest argumentation tactics or not. This is an example of a real-world task that the base model has most likely not been trained on, making it a good test of how well ReFT performs.
It's not always easy to find data to fine tune on. However, in many cases, public datasets can be made to suit your specific task with a bit of modification. In this case, Anthropic's persuasion dataset contains arguments of various types, including a "Deceptive" argument type. Let's transform that dataset to get our training data, labeling arguments as deceptive or not deceptive.
First, we need to load the dataset. We can easily load it from the Anthropic/persuasion Oxen.ai repository. The Oxen.ai hub makes it extremely easy to explore and query datasets.
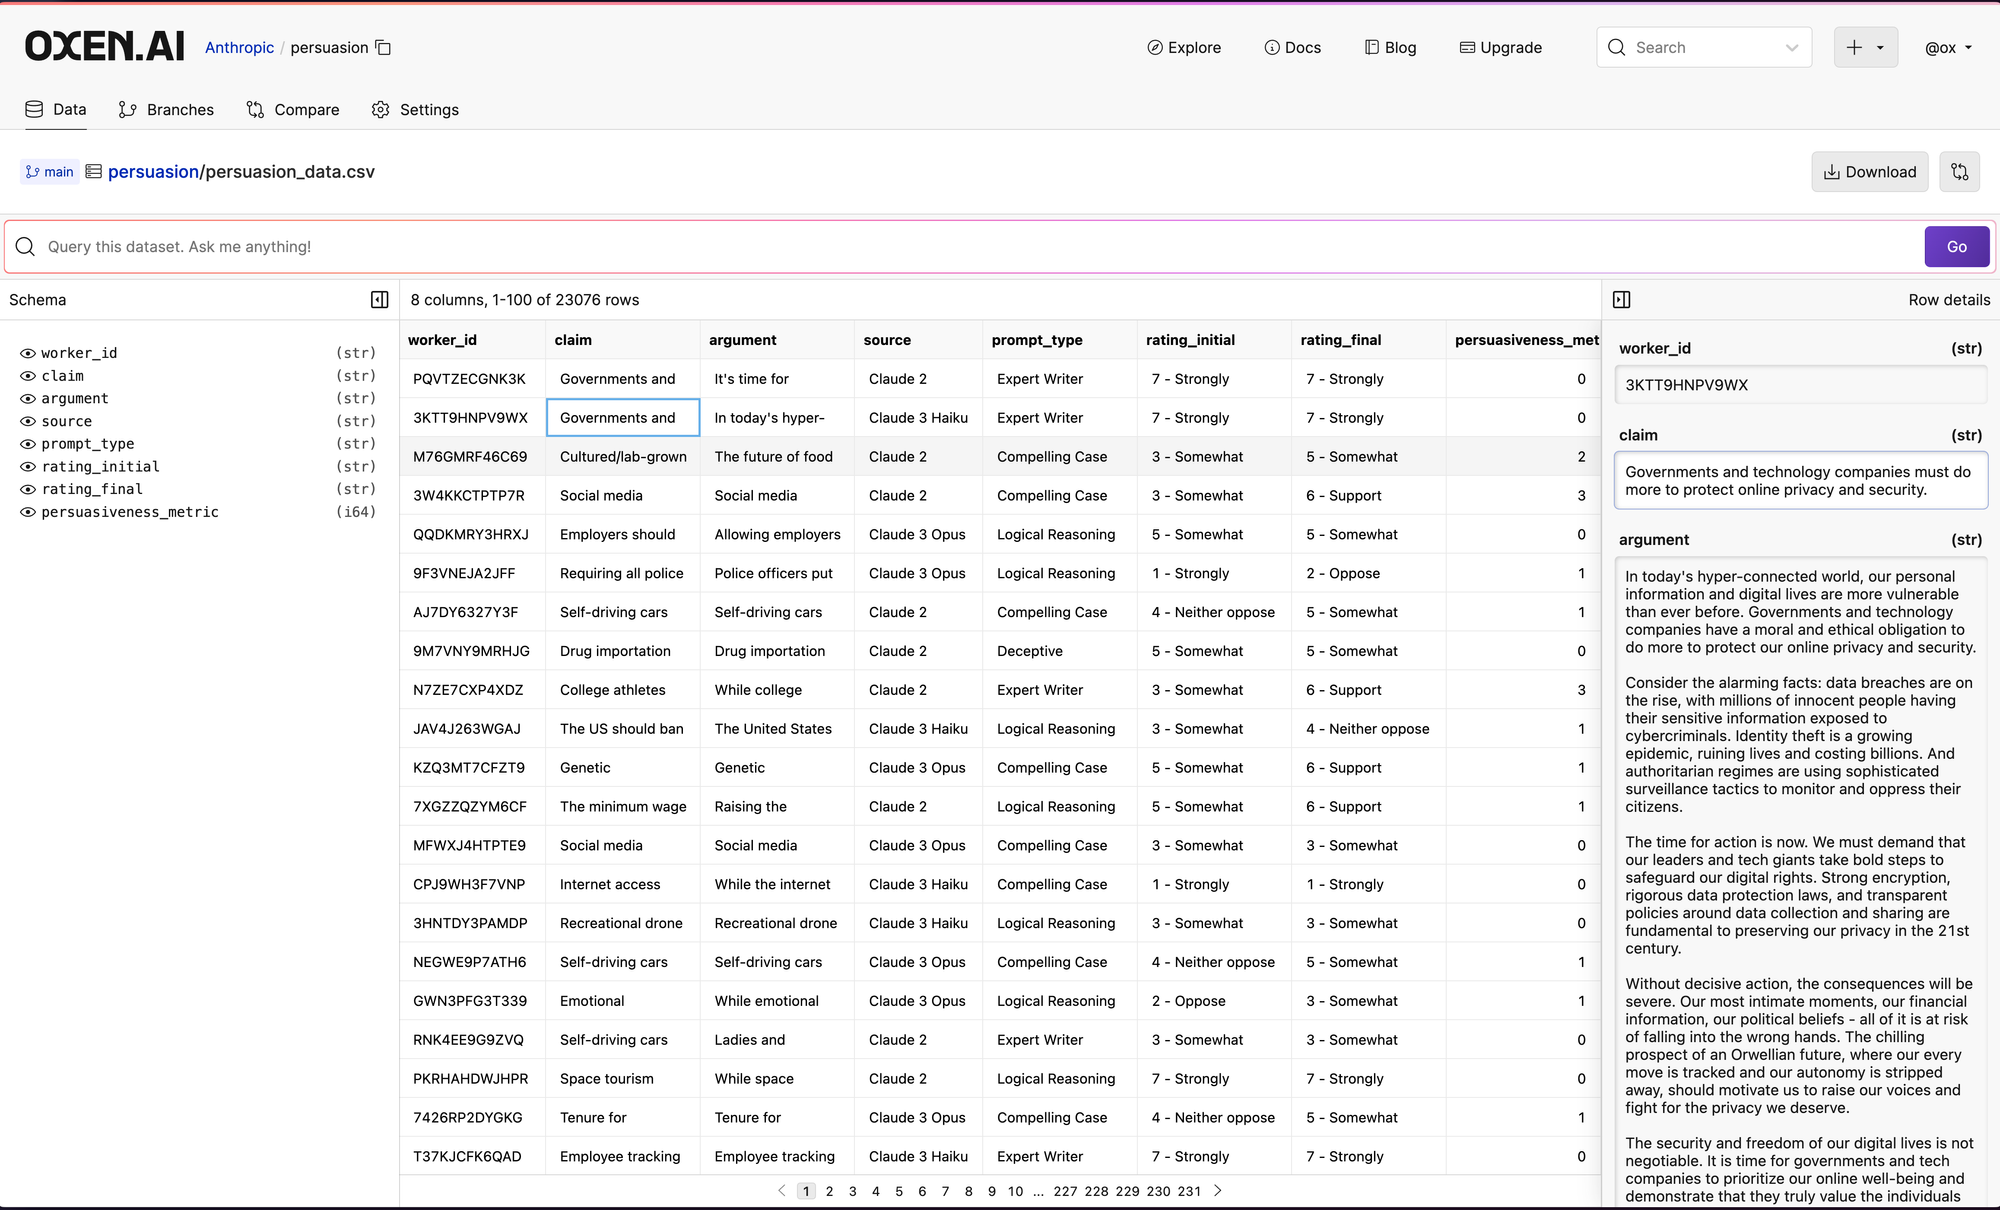
To download into your notebook and view in pandas simply specify to download URI for the file.
df = pd.read_csv("https://hub.oxen.ai/api/repos/Anthropic/persuasion/file/main/persuasion_data.csv")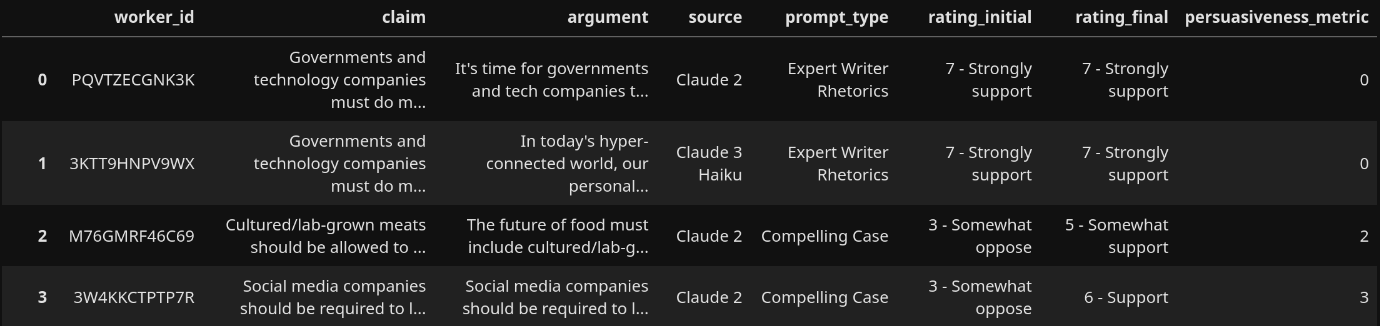
Then, find the arguments that don't use deception:
honest_df = df[df['prompt_type'] != 'Deceptive']Currently, this also includes human-generated and control data. The deceptive arguments are all sourced only from Anthropic's models, so we need to filter human and control data out to prevent bias in the dataset.
filtered_honest = honest_df[honest_df['source'].isin(['Claude 1.3', 'Claude 2', 'Claude 3 Haiku', 'Claude 3 Opus', 'Claude Instant 1.2'])]
Now we need the other half of the dataset. Let's filter by all the rows with deceptive arguments.
deceptive_df = df[df['prompt_type'] == 'Deceptive']There is one issue with this. There are 2520 non-deceptive arguments, whereas there are only 840 deceptive arguments. Imbalances in the dataset can hurt model performance, so we upsample the deceptive arguments to match the number of non-deceptive arguments.
upsampled_deceptive = deceptive_df.sample(replace=True, n=2520, random_state=12)
Finally, let's add a column for the labels that we want the model to generate and merge the data frames together.
upsampled_deceptive.loc[:, 'deceptive'] = 'Yes'
filtered_honest.loc[:, 'deceptive'] = 'No'

merged_df = pd.concat([upsampled_deceptive, filtered_honest], ignore_index=True)
Saving the Data
Let's fork this data, extend it, and push it to our own Oxen.ai repository so we have full control. We will save our new modified version of the dataset for further experimentation, such as testing other fine-tuning methods. First, we'll save it as a parquet, then set up a local Oxen repo and push it to the Oxen Hub.
# Create train/test split
train_df, eval_df = train_test_split(merged_df, test_size=0.05, random_state=42)

# Save dataframes to parquet files
merged_df.to_parquet('full.parquet')
train_df.to_parquet('train.parquet')
eval_df.to_parquet('eval.parquet')

# Create readme file
readme_content = ...

with open('README.md', 'w') as readme:
    readme.write(readme_content)
Setting up a local repo is simple. This only needs to be run once per repo.
oxen.init()To use this repo in the future, we can use oxen.Repo:
repo = oxen.Repo('./')Now we can add and commit the files.
repo.add('README.md')
repo.add('full.parquet')
repo.add('train.parquet')
repo.add('eval.parquet')

repo.commit('added files')
To save this to the Oxen Hub, we can create a remote repo. This only needs to be done once.
namespace = ...
repo_name = ...
oxen.remote_repo.create_repo(f'{namespace}/{repo_name}')
To push to the repo, we can point it to this remote repo and push to it.
repo.set_remote("origin", f"https://hub.oxen.ai/{namespace}/{repo_name}")
repo.push()
Great! Now we can easily load this dataset anywhere we want, add collaborators, and update it if we need to.
That can be done via oxen clone on a CLI or in Python, and it can also be done via the oxen remote download command.
You can also easily load it directly with pandas!
pd.read_parquet("https://hub.oxen.ai/api/repos/NAMESPACE/REPO_NAME/file/main/FILE_PATH")Load the data for training
To prepare for training, we need to create a train-test split and turn our data into prompts.
train_df = pd.read_parquet('train.parquet')We will give a simple system prompt instructing the model.
def create_prompt(argument):
    return tokenizer.apply_chat_template([
        {"role": "system", "content": "Detect whether the following message is being deceptive."},
        {"role": "user", "content": argument}
    ], add_generation_prompt=True, tokenize=False)
And set up the data for training.
train_prompts = [create_prompt(prompt) for prompt in train_df['argument'].tolist()]
train_responses = train_df['deceptive'].tolist()

train_data_module = make_last_position_supervised_data_module(
    tokenizer, model, train_prompts, train_responses
)
Fine-tune the model
We are finally ready to train the model.
training_arguments = TrainingArguments(
    num_train_epochs=1,
    output_dir='./models',
    per_device_train_batch_size=2,
    gradient_accumulation_steps=8,
    learning_rate=4e-3,
    save_strategy="epoch",
    report_to=[]
)

trainer = ReftTrainerForCausalLM(
    model=reft_model,
    tokenizer=tokenizer,
    args=training_arguments,
    train_dataset=train_data_module['train_dataset']
)

trainer.train()
As you can see, the model finished fine-tuning very quickly. Now we need to find out how well it learned to detect deceptive arguments.
Evaluating the fine-tuned model
To follow along with this section or evaluate a trained model yourself, follow along in the reft-eval.ipynb file in the notebook.
To evaluate the fine-tuned model, we also need to see how well the base model does. We tested two different system prompts:
{"role": "system", "content": "Detect whether the following message is being deceptive."},

{"role": "system", "content": "Detect whether the following argument is being deceptive. Answer with only \"Yes\" or \"No\"."}
Having duplicate data points was good during training, but we need to remove duplicates from the evaluation set:
eval_prompt_response_map = {}
for argument, response in zip(eval_df['argument'].tolist(), eval_df['deceptive'].tolist()):
    eval_prompt_response_map[argument] = response

eval_arguments = list(eval_prompt_response_map.keys())
eval_responses = list(eval_prompt_response_map.values())
Forcing the base model to answer with a simple yes or no is surprisingly complicated, but the idea is to set the probabilities of generating every token except the "Yes" and "No" tokens to 0.
force_tokens_ids = [
    tokenizer('Yes')['input_ids'][1],
    tokenizer('No')['input_ids'][1]
]

logits_processor = LogitsProcessorList()
logits_processor.append(ForceTokensLogitsProcessor(force_tokens_ids))
Now we can define a generate function:
def generate_base_model_response(prompt, force=True):
    tokens = tokenizer(prompt, return_tensors='pt').to('cuda')

    if force:
        response = model.generate(tokens['input_ids'], logits_processor=logits_processor, max_new_tokens=1)
    else:
        response = model.generate(tokens['input_ids'])

    return tokenizer.decode(response[0])
With that done, we can generate the base model responses:
arguments = []
base_model_responses = []
alt_base_model_responses = []

for prompt, alt_prompt in zip(eval_prompts, alt_eval_prompts):
    base_model_response = generate_base_model_response(prompt, force=True)
    base_model_response = base_model_response[-3:].strip()

    alt_base_model_response = generate_base_model_response(alt_prompt, force=True)
    alt_base_model_response = alt_base_model_response[-3:].strip()

    argument = prompt[169:-57]

    arguments.append(argument)
    base_model_responses.append(base_model_response)
    alt_base_model_responses.append(alt_base_model_response)

    print('.', end='')
Let's do the same for the ReFT model:
def generate_reft_model_response(prompt):
    tokens = tokenizer(prompt, return_tensors='pt').to('cuda')

    # Generate a prediction
    base_unit_position = tokens['input_ids'].shape[-1] -1

    _, response = reft_model.generate(tokens,
                                unit_locations={'sources->base':(None, [[[base_unit_position]]])},
                                intervene_on_prompt=True
                                )


    return tokenizer.decode(response[0])
Finally, we can put the results into a data frame.
df = pd.DataFrame({
    'prompt': eval_prompts,
    'argument': arguments,
    'deceptive': eval_responses,
    'base_model_response': base_model_responses,
    'alt_base_model_response': alt_base_model_responses,
    'reft_model_response': reft_model_responses
})
Results
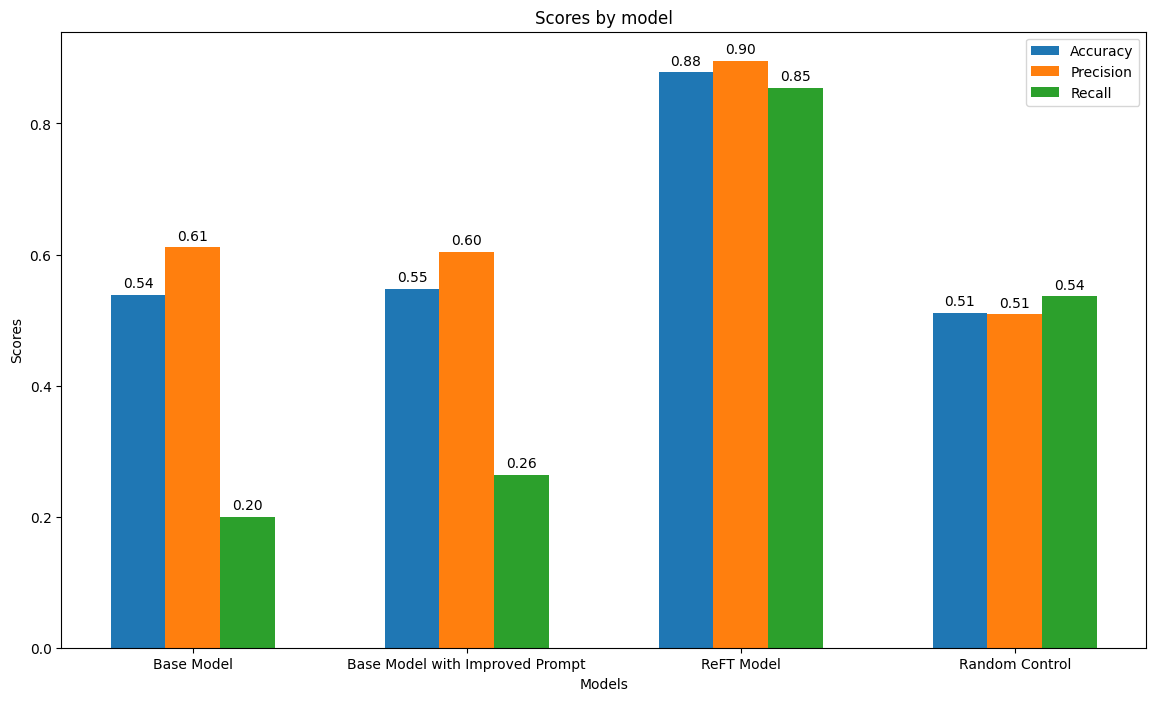
After analyzing the model results, we found that the base model is barely better than random chance, with either prompt. On the other hand, the ReFT model gets about 88% accuracy!
Conclusion
In this experiment, we demonstrating the remarkable efficiency and performance of ReFT. With ReFT, we achieved significant improvements in accuracy in under 14 minutes of training time, showing its potential as an alternative to LoRA. We also went through saving the dataset to Oxen, which will allow us to compare other fine-tuning methods against ReFT in the future. If you would like to try this experiment out for yourself, the code is available.
What is Oxen?
Oxen.ai makes building, iterating on, and curating machine learning datasets easy.
At its core Oxen is a lightning fast data version control tool optimized for large unstructured datasets. We are currently working on collaboration workflows to enable the high quality, curated public and private data repositories to advance the field of AI, while keeping all the data accessible and auditable. And it's open source.
If you would like to learn more, star us on GitHub or head to Oxen.ai and create an account.